V2 Protocol & Security
This is a guide for early adopters who wish to test and study the Version 2 Protocol and Security project.
This is a Hard Mode guide that does everything manually and with no Configuration Management.
Requirements
- Choria Nightly
- Choria AAA Service Nightly
- Choria Provisioner Nightly
- Docker on Intel CPU
Security Credentials
Security is by means of a ed25519 key that signs JWTs, some JWTs form a chain and can sign others. Regardless of the signer verification can be done using the public key associated with the Organization Issuer.
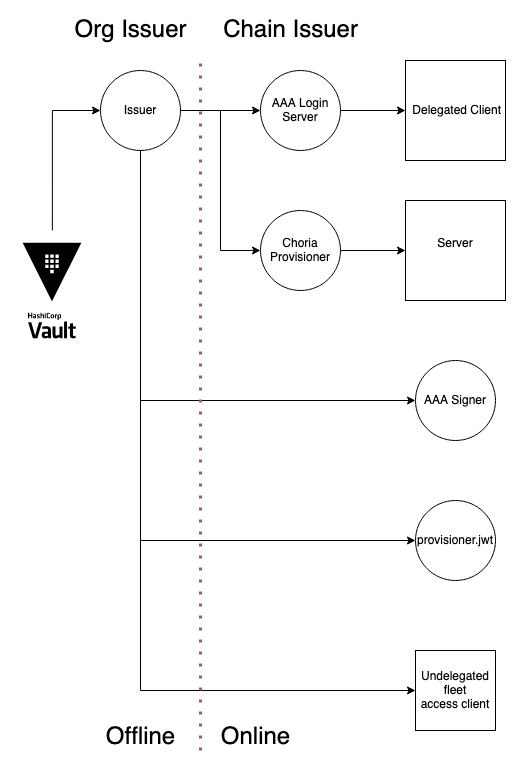
The Organization Issuer can be kept offline with Provisioning and AAA being delegated authorities capable of signing servers and clients but these are optional components - the Organization Issuer can directly sign Clients and Servers allowing them to operate without the other central components.
Deployment Methods
We demonstrate two deployment methods:
- Decentralized - like traditional Choria with only a broker as shared component
- Centralized AAA and Provisioning - uses Choria AAA Service and Choria Provisioner for low-touch auto enrolment of Clients and Servers
Additionally, we show how Hashicorp Vault can be integrated to manage the Organization Issuer
We recommend reviewers really dig into the details here, we do have a Docker Compose environment with this all setup.
Decentralized deployment
In this model we will deploy a system that resembles the basic architecture diagram below
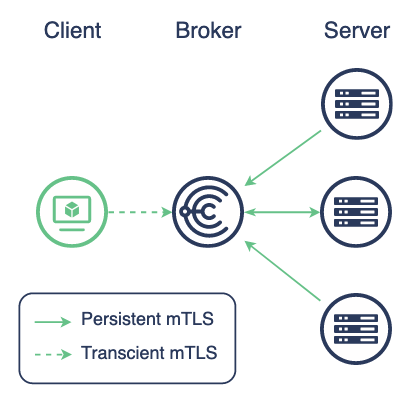
We have only the Brokers as central architecture with no Central AAA or Provisioning.
We will not use mTLS in this case. mTLS is supported but a major advantage of this mode is that it’s not required.
Docker
We will need two Docker networks and 3 instances - broker, server, client and issuer.
$ docker network create choria_v2proto
$ docker network create choria_issuer
$ docker pull registry.choria.io/choria-nightly/choria:nightly
$ docker run -ti --rm --entrypoint bash \
      --network choria_v2proto \
      --hostname broker.example.net \
      registry.choria.io/choria-nightly/choria:nightly -l
$ docker run -ti --rm --entrypoint bash \
      --network choria_v2proto \
      --hostname server.example.net \
      registry.choria.io/choria-nightly/choria:nightly -l
$ docker run -ti --rm --entrypoint bash \
      --network choria_v2proto \
      --hostname client.example.net \
      registry.choria.io/choria-nightly/choria:nightly -l
$ docker run -ti --rm --entrypoint bash \
      --network choria_issuer \
      --hostname issuer.example.net registry.choria.io/choria-nightly/choria:nightly -l
The issuer is not needed per-se but will demonstrate that the Issuer credentials never need to near the managed network.
Keys and JWTs
In this Scenario we need:
- An Organization Issuer keypair
- A client JWT for each user
- A server JWT for each server
- x509 certificate for the broker TLS port
In this scenario you are responsible for creating and distributing the keys and tokens.
Organization Issuer
The Organization Issuer is the root of the Trust Chain and is a ed25519 key, let’s create the keypair on the issuer node:
[choria@issuer ~]$ mkdir -p development/issuer
[choria@issuer ~]$ choria jwt keys development/issuer/private.key development/issuer/public.key
Public Key: b3989a299278750427b00213693c2ca02146476a361667682446230842836da8

Ed25519 seed saved in development/issuer/private.keyThis key should be kept private and ideally in a Hashicorp Vault server. See a later section for guidance on Vault.
Broker JWT and Config
Every broker needs a ed25519 Keypair and a signed JWT.
First we create a keypair on the broker, the private key never leaves the broker:
[choria@broker ~]$ choria jwt keys /etc/choria/private.key /etc/choria/public.key
Public Key: 8918c1c7a4aeb4d4ad16729dc9b9c12df021d9296106eb5f072b224aa8f8eee9

Ed25519 seed saved in /etc/choria/private.key
Pass the Public Key to the Organization Issuer who creates a JWT:
[choria@issuer ~]$ mkdir -p development/broker/broker.example.net
[choria@issuer ~]$ choria jwt server development/broker/broker.example.net/token.jwt \
broker.example.net \
8918c1c7a4aeb4d4ad16729dc9b9c12df021d9296106eb5f072b224aa8f8eee9 \
development/issuer/private.key \
--collectives=choria
With access to just the Broker public key the Organization Issuer can create a server token, pass this back to the server who stores it in /etc/choria/broker.jwt.
Note that for version 2 protocol the default collective is ["choria"].
[choria@issuer ~]$ choria jwt development/broker/broker.example.net/token.jwt development/issuer/public.key
Validated Server Token development/server/server.example.net/token.jwt

             Identity: server.example.net
           Expires At: 2023-12-08 13:03:23 +0000 UTC (364d23h59m41s)
          Collectives: choria
           Public Key: 8918c1c7a4aeb4d4ad16729dc9b9c12df021d9296106eb5f072b224aa8f8eee9
    Organization Unit: choria
   Private Network ID: 92328d88bef9d063480fd4b0ec5e4879

   Broker Permissions:

          No server specific permissions granted
We pass the JWT back to the broker and save in /etc/choria/broker.jwt.
The broker need x509 certificates to open the TLS network port, here we just self-sign one but you can get those from anywhere.
[choria@broker ~]$ openssl genrsa -out /etc/choria/broker-tls.key 2048
Generating RSA private key, 2048 bit long modulus (2 primes)
..+++++
....................................................................................................+++++
e is 65537 (0x010001)
[choria@broker ~]$ openssl req -new -x509 -sha256 -key /etc/choria/broker-tls.key \
   -out /etc/choria/broker-tls.cert -days 365 -subj "/O=Choria.io/CN=broker.example.net"
With all in place it should look like this:
[choria@broker ~]$ find /etc/choria/
/etc/choria/
/etc/choria/broker.conf
/etc/choria/broker-tls.key
/etc/choria/broker-tls.cert
/etc/choria/private.key
/etc/choria/public.key
/etc/choria/broker.jwt
We create the broker configuration in /etc/choria/broker.conf and start it, you need to change your issuer here:
# The name of the organization to configure, for now only supports choria
plugin.security.issuer.names = choria

# The public key from the issuer
plugin.security.issuer.choria.public = b3989a299278750427b00213693c2ca02146476a361667682446230842836da8

# Configures access to broker internal statistics and more
plugin.choria.network.system.password = sYst3m

# Used later in the Provisioner based setup
plugin.choria.network.provisioning.client_password = s3cret

plugin.choria.stats_port = 8222
plugin.choria.broker_network = true
plugin.choria.network.client_port = 4222
plugin.choria.network.stream.store = /data
plugin.choria.network.system.user = system
loglevel = info
plugin.choria.use_srv = false

plugin.security.provider = choria
plugin.security.choria.certificate = /etc/choria/broker-tls.cert
plugin.security.choria.key = /etc/choria/broker-tls.key
plugin.security.choria.token_file = /etc/choria/broker.jwt
plugin.security.choria.seed_file = /etc/choria/private.key
Let’s start the broker, showing the key lines from the output here:
$ choria broker run --config /etc/choria/broker.conf
INFO[0000] Choria Broker version 0.99.0.20221201 starting with config /etc/choria/broker.conf
INFO[0000] Starting Network Broker
WARN[0000] Allowing unverified TLS connections for Organization Issuer issued connections  component=network
WARN[0000] Loaded Organization Issuer choria with public key b3989a299278750427b00213693c2ca02146476a361667682446230842836da8  component=network
INFO[0000] Listening for client connections on [::]:4222  component=network_broker
...
Server JWT
Every server needs a ed25519 Keypair and a signed JWT.
The server process is identical to the broker process except change broker.example.net to server.example.net in identities and make obvious file name changes. Servers do not need any x509 certificates like brokers.
Now we can configure and start the server, place this in /etc/choria/server.conf:
# The name of the organization to configure, for now only supports choria
plugin.security.issuer.names = choria

# The public key from the issuer
plugin.security.issuer.choria.public = b3989a299278750427b00213693c2ca02146476a361667682446230842836da8

# We enable authorization and set it to trust the JWT tokens policy
rpcauthorization = 1
rpcauthprovider = aaasvc

plugin.security.provider = choria
plugin.security.choria.token_file = /etc/choria/server.jwt
plugin.security.choria.seed_file = /etc/choria/private.key
plugin.choria.middleware_hosts = nats://broker.example.net:4222
And finally let’s run the server, showing key log lines only:
Servers usually run as root, here as the choria user as it’s in the container
[choria@server ~]$ choria server run --config /etc/choria/server.conf
INFO[0000] Choria Server version 0.99.0.20221201 starting with config /etc/choria/server.conf using protocol version 2
INFO[0000] Setting JWT token and unique reply queues based on JWT for "server.example.net"  component=server connection=server.example.net identity=server.example.net
INFO[0000] Setting custom inbox prefix based on unique ID to choria.reply.77e64440ac709c0836487e5b77334e5b  component=server connection=server.example.net identity=server.example.net
Client JWT
Every client needs a ed25519 keypair and a signed JWT.
We will create a client that has access to Choria Streams and the ability to manage the fleet without any AAA Server.
The client will create their own keypair, so we run that in the client node:
[choria@client ~]$ mkdir -p ~/.config/choria/
[choria@client ~]$ choria jwt keys ~/.config/choria/private.key ~/.config/choria/public.key
Public Key: 4bbfddb9f70f4b39f5b13bac8e83a9a31c3af49e388da86a666f8615101bc818

Ed25519 seed saved in /home/choria/.config/choria/private.key
This client private.key should be kept private and not shared, the JWT can be created with knowledge of the public key only.
The client pass their Public Key to the Organization Issuer who creates a JWT on the Issuer node:
Here we use choria as the identity, this would match the unix user name.
If a user is on many machines, create a JWT per machine.
[choria@issuer ~]$ mkdir -p development/client/choria
[choria@issuer ~]$ choria jwt client development/client/choria/token.jwt choria development/issuer/private.key \
 --public-key 4bbfddb9f70f4b39f5b13bac8e83a9a31c3af49e388da86a666f8615101bc818 \
 --stream-admin \
 --event-viewer \
 --elections-user \
 --service \
 --fleet-management \
 --agents '*' \
 --validity 1y
Saved token to development/client/choria/token.jwt, use 'choria jwt view development/client/choria/token.jwt' to view it
With access to the Issuer private key, but not the user private key, we can create a JWT for the user. Since we have no AAA Service we mark this user as a service which allows them to have a long token validity. We set a policy allowing all agent access, in real life this would be an Open Policy Agent policy.
[choria@issuer ~]$ choria jwt development/client/choria/token.jwt development/issuer/public.key
Validated Client Identification Token development/client/choria/token.jwt

          Caller ID: choria
  Organization Unit: choria
     Allowed Agents: *
         Public Key: 4bbfddb9f70f4b39f5b13bac8e83a9a31c3af49e388da86a666f8615101bc818
 Private Network ID: 0a63c70a8817f5ef4d19d055ce6513f1
         Expires At: 2023-12-08 12:54:07 +0000 UTC (364d23h59m19s)

 Client Permissions:

      Can manage Choria fleet nodes
      Can use Leader Elections
      Can view Lifecycle and Autonomous Agent events
      Can administer Choria Streams
      Can access the Broker system account
      Can have an extended token lifetime
Pass the JWT back to the client who saves it in ~/.config/choria/token.jwt.
[choria@client ~]$ find ~/.config
/home/choria/.config
/home/choria/.config/choria
/home/choria/.config/choria/private.key
/home/choria/.config/choria/public.key
/home/choria/.config/choria/token.jwt
We create a system-wide client configuration in /etc/choria/client.conf:
loglevel = warn
plugin.choria.middleware_hosts = broker.example.net:4222
plugin.choria.network.system.user = system
plugin.choria.network.system.password = sYst3m

plugin.security.provider = choria
plugin.security.choria.token_file = ~/.config/choria/token.jwt
plugin.security.choria.seed_file = ~/.config/choria/private.key
We can now test the client:
[choria@client ~]$ choria ping
server.example.net                       time=3 ms

---- ping statistics ----
1 replies max: 4ms min: 4ms avg: 4ms overhead: 12ms
Other commands like choria req choria_util info should work demonstrating authorization works and choria broker server list should list the broker indicating Broker System Account access works. After a minute or so choria broker stream ls will show a list of Streams demonstrating Choria Streams authority worked.
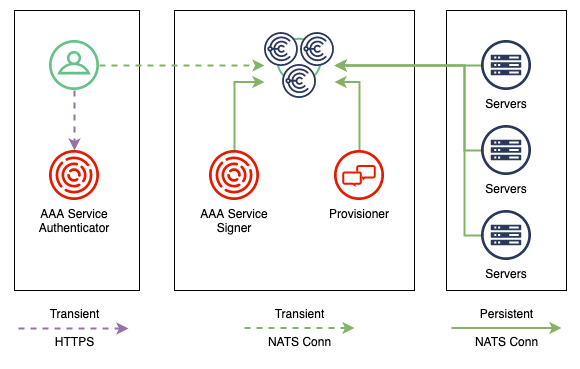
Self Provisioned and AAA Integrated Deployment
Thus far we had to manually sign and configure every single server and client, we had to copy files around and more, it’s all a bit tedious.
Lets see how Choria can configure itself and how user management can be centralized for self-service user enrollment.
- Instead of signing Server JWTs servers will go to Choria Provisioner to obtain credentials and configuration
- Instead of issuing Client JWTs for every user that are long-lasting we will use a central authorization flow to issue short-lived JWTs and distribute them
Docker
We will create re-use the networks we made before, and we can keep the same issuer.example.net and broker.example.net.
So stop and recreate your server and client containers, we’ll 2 more container during the guide.
Issuer
The issuer is unchanged from before, so just follow the same steps as before or keep the one you have if you followed the Decentralized section.
Broker
The broker is unchanged from before, so just follow the same steps as before or keep the one you have if you followed the earlier Decentralized section.
You will note we have a setting in the broker.conf:
plugin.choria.network.provisioning.client_password = s3cretThis instructs the broker that we will be connecting servers needing provisioning to it. You should see a log line like:
WARN[0000] Allowing Provisioner connections subject to JWT claims component=networkProvisioner
The Choria Provisioner is a service that configures new Choria Servers:
- Enrolls servers into the Issuer
- Create a per-node configuration
- Deploys Open Policy Agent policies
- Configures the server
- Optionally perform version upgrades
We have CLI tooling allowing you to re-provision servers on demand and more. Review its documentation for full detail.
It needs to connect to the broker, so it needs JWT token, let’s create the container and create the private key:
Since the container does not have the choria command we have to jump some hoops, we’ll make a local storage directory for its configuration and keys and then mount that in.
host$ mkdir provisioner
host$ docker run -v `pwd`/provisioner:/etc/choria-provisioner --user root --entrypoint bash --rm -ti registry.choria.io/choria-nightly/choria:nightly -l
[root@5d96691fa69f /]# choria jwt keys /etc/choria-provisioner/private.key /etc/choria-provisioner/public.key
Public Key: a8c15c0a4bbae0646d0c5aa92513f4d58c2c0e51464b4b267bb3a42dbebd1c8a
[root@5d96691fa69f /]# chown -R choria:choria /etc/choria-provisioner/
[root@5d96691fa69f /]# exit
Next we create a provisioner JWT and save it in provisioner/token.jwt
[choria@issuer ~]$ mkdir -p development/provisioner
[choria@issuer ~]$ choria jwt client development/provisioner/token.jwt provisioner_signer development/issuer/private.key \
    --public-key a8c15c0a4bbae0646d0c5aa92513f4d58c2c0e51464b4b267bb3a42dbebd1c8a \
    --server-provisioner \
    --validity 365d \
    --issuer
Here we create a token that has access to the NATS Account new machines will join, it’s a year valid and it can issue new credentials.
Place the development/provisioner/token.jwt on your host in provisioner/token.jwt, next to private.key and public.key we made above.
We will not delve much into the Provisioner configuration details, visit its documentation site for details.
We need to configure how the Provisioner use these files, create provisioner/client.cfg on your host:
plugin.security.provider = choria
plugin.security.choria.token_file = /etc/choria-provisioner/token.jwt
plugin.security.choria.seed_file = /etc/choria-provisioner/private.key

identity = provisioner_signer

plugin.choria.middleware_hosts = nats://broker.example.net:4222
Next we create the Provisioner configuration file in provisioner/choria-provisioner.yaml:
# The issuer public key
jwt_verify_cert: b3989a299278750427b00213693c2ca02146476a361667682446230842836da8
interval: 1m
logfile: /dev/stdout
loglevel: info
helper: /etc/choria-provisioner/helper.rb
token: s3cret
choria_insecure: false
site: PREVIEW
broker_provisioning_password: s3cret
jwt_signing_key: private.key
jwt_signing_token: token.jwt

features:
  jwt: true
  ed25519: true
Next we need the script that generates per-node configuration, store the helper.rb in provisioner/helper.rb and change the ISSUER constant near the top.
host$ vi provisioner/helper.rb
host$ chmod a+x provisioner/helper.rb
host$ sudo chown -R 2048:2048 provisioner
We can now run our Provisioner:
host$ docker run -ti --rm -v `pwd`/provisioner:/etc/choria-provisioner \
    --network choria_v2proto \
    --hostname provisioner.example.net \
    choria/provisioner:nightly
Servers
For servers, we are going to need the RPM (already in the container) and a new file /etc/choria/provisioning.jwt. This is read by the server process and tells it to enter provisioning mode.
The JWT file is basically just a configuration file signed by our Issuer. The server reads it unvalidated but the Provisioner will ensure the incoming server holds the token signed by our Issuer.
[choria@issuer ~]$ choria jwt prov development/server/provisioning.jwt \
    development/issuer/private.key \
    --token s3cret \
    --urls nats://broker.example.net:4222 \
    --protocol-v2 \
    --default
Saved token to development/server/provisioning.jwt, use 'choria jwt view development/server/provisioning.jwt' to view it

[choria@issuer ~]$ choria jwt development/server/provisioning.jwt
Unvalidated Provisioning Token development/server/provisioning.jwt

                         Token: *****
                        Secure: false
                          URLS: nats://broker.example.net:4222
       Provisioning by default: true
      Using version 2 Protocol: true
       Server Version Upgrades: false
               Standard Claims: {
                                  "purpose": "choria_provisioning",
                                  "iss": "Choria Tokens Package v0.99.0.20221210",
                                  "sub": "choria_provisioning",
                                  "nbf": 1670850426,
                                  "iat": 1670850426,
                                  "jti": "60a2973b10304184b997f9ea50eeb7a4"
                                }
Copy this to your host before running the server. We need to mount this token into the server containers, no other configuration is needed:
host$ docker run -ti --rm \
      --network choria_v2proto \
      --hostname server.example.net \
      -v `pwd`/provisioning.jwt:/etc/choria/provisioning.jwt \
      registry.choria.io/choria-nightly/choria:nightly server run --config /etc/choria/server.conf
The server will now start and connect to the Broker, communicate with the Provisioner and restart itself. After restart the client (configured next) will be able to communicate with it.
Previously we had to use choria jwt keys and choria jwt server to create Private keys and to issue a signed JWT and then manually transfer that to the Server and configure the Server. This all happens under Choria Provisioner control and takes just a few milliseconds. The only site-unique part about a machine is now the provisioner.jwt that is shared by your fleet, so it’s easily placed there during base image build or configuration management. You could issue node-unique provisioning.jwt files with extended information in them and in your helper.rb perform additional validation if you needed that much control.
AAA Service
To provide a self-service system for Clients configure the Choria AAA Service. Here we will configure it to both issue JWTs and Sign individual requests - meaning it’s required to be available for every RPC request. The signing part is optional though, and we could skip that, using it only to obtain JWT tokens.
We will not delve much into the AAA Service configuration details, visit its documentation site for details.
We need to issue 3 sets of credentials here:
- One to sign users who request their JWT using
choria logincalled the Chain Signer, since this is HTTP it also needs a x509 certificate - One to sign RPC requests on behalf of users after evaluating policies and auditing requests called the Request Signer
- One to connect to Choria Broker with and run a Choria RPC Service that will receive requests from users to sign their requests called a Signer Service.
Like the Provisioner the AAA Service container does not have the choria binary, so we need to jump some hoops to make the keys and configuration:
host$ docker run -ti --rm -v `pwd`/aaasvc:/etc/aaasvc --user root --entrypoint bash registry.choria.io/choria-nightly/choria:nightly -l
[root@38f75c90e475 /]# openssl genrsa -out /etc/aaasvc/https-private.key 2048
Generating RSA private key, 2048 bit long modulus (2 primes)
........................................................................................+++++
...................................+++++
[root@38f75c90e475 /]# openssl req -new -x509 -sha256 -key /etc/aaasvc/https-private.key -out /etc/aaasvc/https-public.crt -days 365 -subj "/O=Choria.io/CN=aaa.choria.local"
[root@38f75c90e475 /]# choria jwt keys /etc/aaasvc/chain-signer-private.key /etc/aaasvc/chain-signer-public.key
Public Key: 17807f2c5fa959383ee5851813863426525c081f6464556e5dec482e815caded

Ed25519 seed saved in /etc/aaasvc/chain-signer-private.key
We create a self-signed x509 certificate since the Authentication service runs over HTTPS, you can use any certificate for this.
Further we create a key used to sign JWTs for users running choria login, it needs a special JWT:
[choria@issuer ~]$ mkdir -p development/aaasvc
[choria@issuer ~]$ choria jwt client development/aaasvc/chain-signer.jwt aaa_chain_signer \
    development/issuer/private.key \
    --public-key  17807f2c5fa959383ee5851813863426525c081f6464556e5dec482e815caded \
    --no-fleet-management \
    --issuer \
    --validity 365d
Saved token to client development/aaasvc/chain-signer.jwt, use 'choria jwt view client development/aaasvc/chain-signer.jwt' to view it
Copy this file to the temporary AAA container above as /etc/aaasvc/chain-signer.jwt.
Next we create the credentials that will sign every RPC request:
host$ docker run -ti --rm -v `pwd`/aaasvc:/etc/aaasvc --user root --entrypoint bash registry.choria.io/choria-nightly/choria:nightly -l
[root@38f75c90e475 /]# choria jwt keys /etc/aaasvc/request-signer-private.key /etc/aaasvc/reqeuest-signer-public.key
Public Key: 535e9d337e555b9bf9079269567b8d9cb812fdf54797e5d5441ed778f1db68d8

Ed25519 seed saved in /etc/aaasvc/request-signer-private.key
This is the key used to sign individual user RPC requests on their behalf, it needs a special JWT:
[choria@issuer ~]$ mkdir -p development/aaasvc
[choria@issuer ~]$ choria jwt client development/aaasvc/request-signer.jwt aaa_request_signer \
    development/issuer/private.key \
    --public-key 535e9d337e555b9bf9079269567b8d9cb812fdf54797e5d5441ed778f1db68d8 \
    --no-fleet-management \
    --auth-delegation \
    --validity 365d
Saved token to development/aaasvc/request-signer.jwt, use 'choria jwt view development/aaasvc/request-signer.jwt' to view it
Place it in /etc/aaasvc/request-signer.jwt on the AAA Service container above.
Finally, we need to create the credentials that allow the request signer to run as a Choria Service.
host$ docker run -ti --rm -v `pwd`/aaasvc:/etc/aaasvc --user root --entrypoint bash registry.choria.io/choria-nightly/choria:nightly -l
[root@38f75c90e475 /]# choria jwt keys /etc/aaasvc/signer-service-private.key /etc/aaasvc/signer-service-public.key
Public Key: c5c1323f66bb8324d019249e3476d9f11f9deb70efa60255593dde30ef3b8a01

Ed25519 seed saved in /etc/aaasvc/signer-service-private.key
Let’s create the server JWT that will host the RPC Service for signing requests
[choria@issuer ~]$ choria jwt server development/aaasvc/signer-service.jwt \
    aaa.example.net \
    c5c1323f66bb8324d019249e3476d9f11f9deb70efa60255593dde30ef3b8a01 \
    development/issuer/private.key \
    --org choria \
    --collectives choria \
    --service \
    --validity 365d
Place it in /etc/aaasvc/signer-service.jwt on the AAA Service container above.
We can now configure the various parts of the AAA Service, it needs a /etc/aaasvc/choria.conf to connect to the network with:
identity = aaa.example.net
plugin.security.provider = choria
plugin.security.choria.seed_file = /etc/aaasvc/signer-service-private.key
plugin.security.choria.token_file = /etc/aaasvc/signer-service.jwt
plugin.choria.middleware_hosts = broker.example.net:4222
We need an /etc/aaasvc/aaasvc.conf:
See the User List Authenticator docs about user, passwords and more. The passwords below are all secret.
{
  "choria_config": "/etc/aaasvc/choria.conf",
  "logfile": "/dev/stdout",
  "loglevel": "info",
  "authenticator": "userlist",
  "authorizer": "opa",
  "signer": "basicjwt",
  "monitor_port": 8081,
  "site": "PREVIEW",
  "tls_certificate": "/etc/aaasvc/https-public.crt",
  "tls_key":"/etc/aaasvc/https-private.key",
  "port":8080,
  "basicjwt_signer": {
    "signing_certificate": "/etc/aaasvc/chain-signer-public.key",
    "signing_token": "/etc/aaasvc/request-signer.jwt",
    "signing_seed": "/etc/aaasvc/request-signer-private.key",
    "max_validity":"2h",
    "choria_service": true
  },
  "userlist_authenticator": {
    "signing_key": "/etc/aaasvc/chain-signer-private.key",
    "signing_token": "/etc/aaasvc/chain-signer.jwt",
    "validity": "1h",
    "users": [
    {
      "username": "admin",
      "password": "$2a$05$zQIl4gUZbqmKhpQhIeWx3uDWhAZaHoG34zW1ZsxXQt5xpL5f4uyny",
      "opa_policy_file": "/etc/aaasvc/admin.rego",
      "broker_permissions": {
        "org_admin": true,
        "system_user": true,
        "signed_fleet_management": true
      }
    },
    {
      "username": "streams",
      "password": "$2a$05$zQIl4gUZbqmKhpQhIeWx3uDWhAZaHoG34zW1ZsxXQt5xpL5f4uyny",
      "broker_permissions": {
        "streams_admin": true
      }
    },
    {
      "username": "choria",
      "password": "$2a$05$zQIl4gUZbqmKhpQhIeWx3uDWhAZaHoG34zW1ZsxXQt5xpL5f4uyny",
      "opa_policy_file": "/etc/aaasvc/admin.rego",
      "broker_permissions": {
        "signed_fleet_management": true
      }
    }
    ]
  }
}See the AAA Service Docs for writing real policies.
Finally, we create an Open Policy Agent policy for the Choria Users, this one just allows everything. Place it in /etc/aaasvc/admin.rego
package io.choria.aaasvc

default allow = true
We can now start the AAA Service:
host$ sudo chown -R 2048:2048 aaasvc
host$ docker run -ti --rm \
    -v `pwd`/aaasvc:/etc/aaasvc \
    --network choria_v2proto \
    --hostname aaa.example.net \
    choria/aaasvc:nightly run --config /etc/aaasvc/aaasvc.conf
Client
Choria Clients will now enroll using choria login which will issue them a 1-hour valid JWT with their policies and more embedded.
Lets create a new client container:
$ docker run -ti --rm --entrypoint bash \
      --network choria_v2proto \
      --hostname client.example.net \
      registry.choria.io/choria-nightly/choria:nightly -l
We create a system-wide client configuration in /etc/choria/client.conf:
loglevel = warn
plugin.choria.middleware_hosts = broker.example.net:4222
plugin.choria.network.system.user = system
plugin.choria.network.system.password = sYst3m

plugin.security.provider = choria
plugin.security.choria.token_file = ~/.config/choria/client.jwt
plugin.security.choria.seed_file = ~/.config/choria/client.key
plugin.choria.security.request_signer.service = true
plugin.login.aaasvc.login.url = https://aaa.example.net:8080/choria/v1/login
Users can now run choria login and authenticate using on of the usernames and the password secret.
The client is now entirely self-service, the token expires every hour, and they just run choria login again. They can do this on as many machines as they have and admins do not get involved.
Every RPC request the client makes will be signed by the AAA Service after Authorization against the OPA Policy and auditing the outcome. Servers will also validate the OPA policy before executing anything.
Vault as Organization Issuer
We support using Hashicorp Vault as the Organization Issuer. In that mode the Private Key is created inside Vault and never has to leave Vault at all.
Here we’ll show the developer mode Vault you should use a Production deployment of Vault and not a simple developer local build.
Starting Vault
We start Vault in dev mode with a static secret defined:
$ vault server -dev -dev-root-token-id root
==> Vault server configuration:

             Api Address: http://127.0.0.1:8200
                     Cgo: disabled
         Cluster Address: https://127.0.0.1:8201
....
WARNING! dev mode is enabled! In this mode, Vault runs entirely in-memory
and starts unsealed with a single unseal key. The root token is already
authenticated to the CLI, so you can immediately begin using Vault.

You may need to set the following environment variables:

    $ export VAULT_ADDR='http://127.0.0.1:8200'

The unseal key and root token are displayed below in case you want to
seal/unseal the Vault or re-authenticate.

Unseal Key: JKyF70iBqv3d9rreY9rhY0/EQ9ornriTZHV+kVWpJ+w=
Root Token: root

Development mode should NOT be used in production installations!
Configuring the Transit Secrets Engine
Choria relies on the Transit Secrets Engine to offload signing of keys.
Let’s enable that:
$ export VAULT_ADDR='http://127.0.0.1:8200
$ export VAULT_TOKEN='root'
$ vault secrets enable transit
Success! Enabled the transit secrets engine at: transit/
Create the Issuer
We use the Vault API to create an ed25519 key stored in Vault storage:
$ export VAULT_ADDR='http://127.0.0.1:8200
$ export VAULT_TOKEN='root'
$ vault write transit/keys/choria_issuer type=ed25519
Success! Data written to: transit/keys/choria_issuer
$ vault read transit/keys/choria_issuer
Key                       Value
---                       -----
allow_plaintext_backup    false
auto_rotate_period        0s
deletion_allowed          false
derived                   false
exportable                false
imported_key              false
keys                      map[1:map[creation_time:2022-12-12T11:21:23.248802439+01:00 name:ed25519 public_key:IZu6TyYAwWeuyD3Q0tEiCGbYBjkRjoOcWO/OI9PDmOE=]]
latest_version            1
min_available_version     0
min_decryption_version    1
min_encryption_version    0
name                      choria_issuer
supports_decryption       false
supports_derivation       true
supports_encryption       false
supports_signing          true
type                      ed25519
Here we see that the public key is shown as public_key:IZu6TyYAwWeuyD3Q0tEiCGbYBjkRjoOcWO/OI9PDmOE=, lets turn that into a hex encoded string:
If saving the public key to a file ensure there is no trailing new line
$ echo IZu6TyYAwWeuyD3Q0tEiCGbYBjkRjoOcWO/OI9PDmOE=|base64 -d|xxd -p -c 64
219bba4f2600c167aec83dd0d2d1220866d80639118e839c58efce23d3c398e1
This is the Organization Issuer you configure in your broker and elsewhere.
Signing JWTs using Vault
The choria jwt commands support the --vault flag that requires VAULT_ADDR and VAULT_TOKEN to be set in environment.
$ choria jwt server \
    token.jwt \
    server.example.net \
    3f2d5d01f3c5caa0cd7359512c7e2d9a727fa0392f47f50adee1866bf02cbe12 \
    choria_issuer \
    --collectives=choria \
    --vault
Here we pass --vault and instead of a path to the Issuer Private Key we give the name choria_issuer that we created in Vault.